
In this article, we will learn how to use YOLOv7: how to implement it, understand the results and use different weights!
YOLOv7 is the second version of YOLO to be published this year 2022.
YOLO stands for You Only Look Once. It is a Deep Learning model used for detection on images and videos.
The first version of YOLO was released in 2016. Since then, frequent updates are made with the latest improvements: faster computation, better accuracy.
We’ve already a tutoriel on how to use YOLOv6. This post will be pretty similar as we want to stick to the basics.
We’ll use the same image as a test to compare both models performance… but keep in mind, performance on one image isn’t performance of the entire model. It’s just a nice hint to start understand both models.
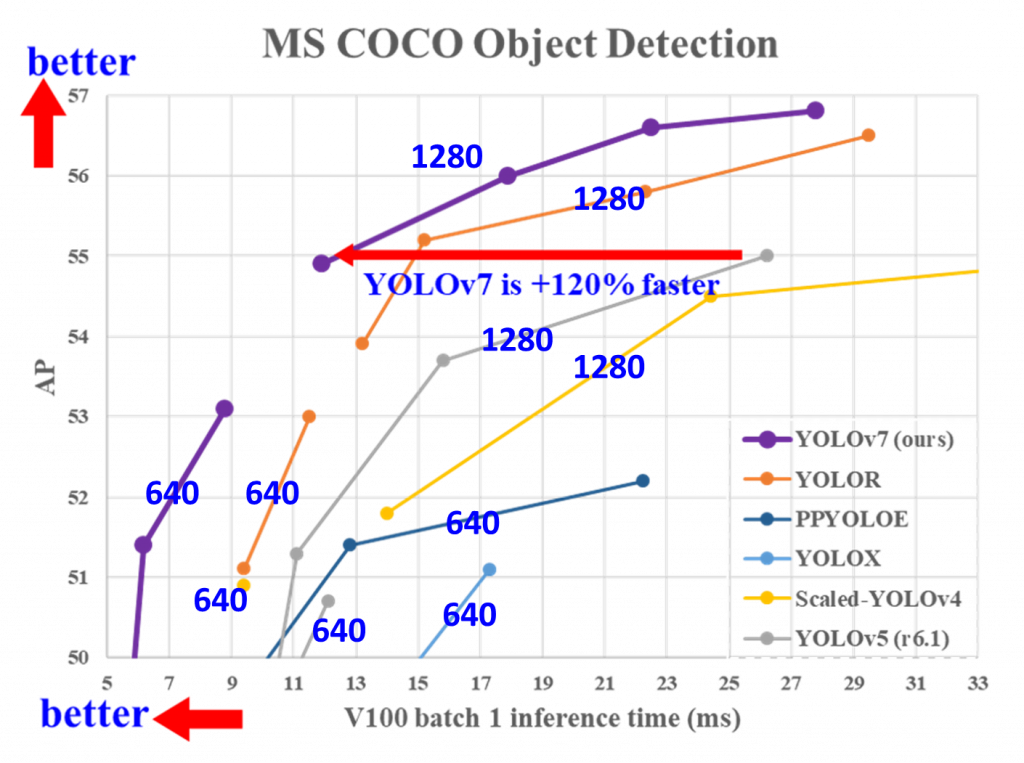
Here are the results of YOLOv7 compared to other versions on the COCO dataset:
Let’s get to it !
How to use YOLOv7 ?
The following lines of code work for any Notebook/Colab instance. If you want to run YOLOv7 on a terminal/locally, just remove the first “!” or “%” from each line of code.
To use YOLOv7, we first need to download the Github repository!
To do this, we’ll use the git clone command to download it to our Notebook:
!git clone https://github.com/WongKinYiu/yolov7.gitThen, we place ourselves in the folder we just downloaded:
%cd yolov7Next, we have to install all the necessary libraries to use YOLOv7.
Main libraries are the following:
- matplotlib
- numpy
- opencv-python
- Pillow
- PyYAML
- requests
- scipy
- torch
- torchvision
- tqdm
- protobuf
Fortunately, only one line of code is needed to install all these dependencies:
!pip install -r requirements.txtWe then want to download the weights of the Neural Network.
Download the weights
With the git clone command, we’ve downloaded all the architecture of the Neural Network (layers of the model, functions to train it, use it, evaluate it, …) but to use it, we also need the weights.
In a Neural Network, the weights are the information obtained by the model during training.
You can manually download any version of the weights here and then put the file in the yolov7 folder.
Or easily download it with this line of code:
!wget https://github.com/WongKinYiu/yolov7/releases/download/v0.1/yolov7-e6e.ptAt the time I’m writing those lines, YOLOv7 has just been released. Updates may occur and the weights may change, as well as the URL of their repository. If the link no longer works, check this Github for the latest version.
One last thing before using the template: upload your image!
Either a single image, or several in a folder (YOLOv7 can handle several images at once).
Feeling lazy ? You can simply upload our test image in one line of code :
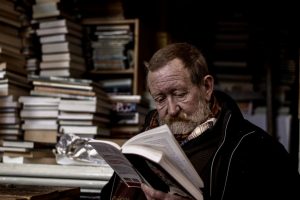
!wget https://raw.githubusercontent.com/tkeldenich/How_to_use_YOLOv7_Tutorial/main/man_cafe.jpg
FINALLY, we can use YOLOv7!
To do this, we’ll call the detect.py file.
The python code in this file will run the detection for us.
We only need to specify a few important parameters, in our case :
By the way, if your goal is to master Deep Learning - I've prepared the Action plan to Master Neural networks. for you.
7 days of free advice from an Artificial Intelligence engineer to learn how to master neural networks from scratch:
- Plan your training
- Structure your projects
- Develop your Artificial Intelligence algorithms
I have based this program on scientific facts, on approaches proven by researchers, but also on my own techniques, which I have devised as I have gained experience in the field of Deep Learning.
To access it, click here :
Now we can get back to what I was talking about earlier.
- weights we are using:
--weightsyolov7-e6e.pt - image on which we want to apply the detection:
--source ./man_cafe.jpg
!python detect.py --weights yolov7-e6e.pt --source ./man_cafe.jpgIf you use your own image or folder, just change this last part to ./your_path.
Understand the results
You’ll find the detection output in the folder yolov7/runs/detect/exp/
Carefull, if you run several experimentation, a new expN folder will be created. For your second experimentation it will be exp2. For the third, exp3, etc.
Here is our result :
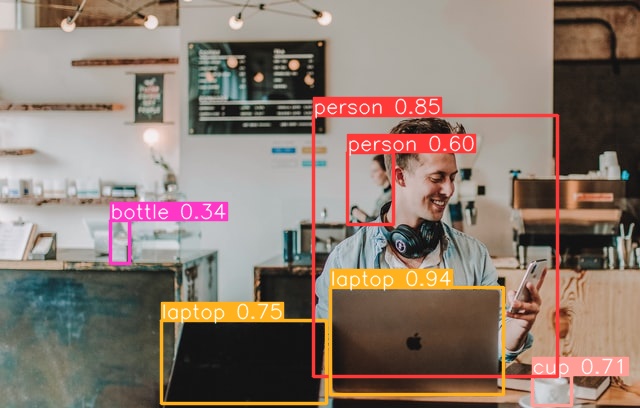
First of all, we can see that the modele has a very good detection capacity. It even detects the person right behind our main character.
You can see that it even indicates the confidence with which it detects objects/people. Most obvious objects are detected with a high confidence threshold. Comparing with YOLOv6 it detect every object on the first plan: two laptop, cellphone, book, cup. On this image, the model is really amazing!
So right now we have the default confidence threshold of 0.25. It means that every detection under the confidence threshold of 25% will be remove.
The confidence threshold defines the minimum confidence value at which detection must be kept.
What if we wanted to increase this threshold?
Actually it’s possible when running YOLOv7.
Remember that we have defined some parameters. The mandatory parameters are the weights and the source (image path), but there are also default parameters that you can change to suit your needs.
There are other parameters, for example:
- Confidence threshold: conf-thres (default value: 0.25)
- Intersection over Union threshold: iou-thres (default value: 0.45)
Let’s change the confidence threshold to 0.6 :
!python detect.py --weights yolov7-e6e.pt --conf 0.60 --img-size 640 --source ./man_cafe.jpgResult :
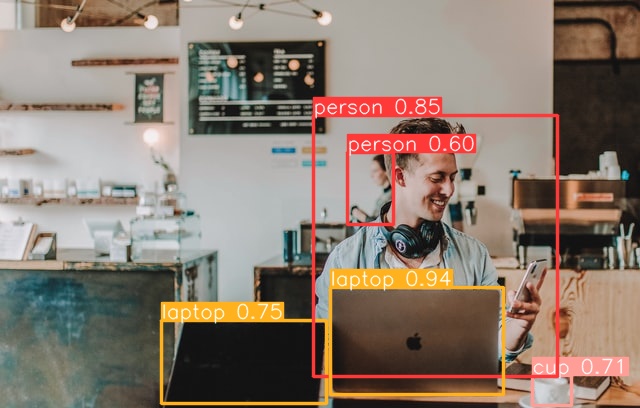
Here we see that the book hasn’t been kept.
Use YOLOv7, make assumptions for your project and set the confidence threshold that suits your need 😉
Changing weights
Now you understand a bit more what YOLOv7 is.
Let’s go deeper.
There are different versions of the model weights.
We have used a large version of these weights.
Large weights mean three things compared to the other versions:
- Better results (or at least a better understanding of the complexity)
- Slower computation speed
- More memory space used
But what if you have space and time constraints?
Well, ou can use other versions of these weights:
- Small: https://github.com/WongKinYiu/yolov7/releases/download/v0.1/yolov7-tiny.pt
- Medium: https://github.com/WongKinYiu/yolov7/releases/download/v0.1/yolov7.pt
- Large: https://github.com/WongKinYiu/yolov7/releases/download/v0.1/yolov7-e6e.pt
Again, you can download them manually here and then put them into your folder, or use wget and specify the version you want:
!wget weight_file_pathDepending on the weight version you’ve chosen, you will have :
- Small: yolov7-tiny.pt
- Medium: yolov7.pt
- Large: yolov7-e6e.pt
To use it, replace weight_file here:
!python tools/infer.py --weights weight_file --source ./man_cafe.jpgYou’ve got almost everything you need to use YOLO v7.
Maybe you’d like to learn how to use this cutting-edge model on pre-recorded video, in addition to detecting objects in a photo.
Maybe you’d even like to use it in real time on a continuous video stream.
It’s entirely possible to use YOLO v7 for these cases, and if you’re interested, I’ve created the free Object Detection Off-road training course to help you learn all about it.
To access your free training, click here :
One last word, if you want to go further and learn about Deep Learning - I've prepared for you the Action plan to Master Neural networks. for you.
7 days of free advice from an Artificial Intelligence engineer to learn how to master neural networks from scratch:
- Plan your training
- Structure your projects
- Develop your Artificial Intelligence algorithms
I have based this program on scientific facts, on approaches proven by researchers, but also on my own techniques, which I have devised as I have gained experience in the field of Deep Learning.
To access it, click here :

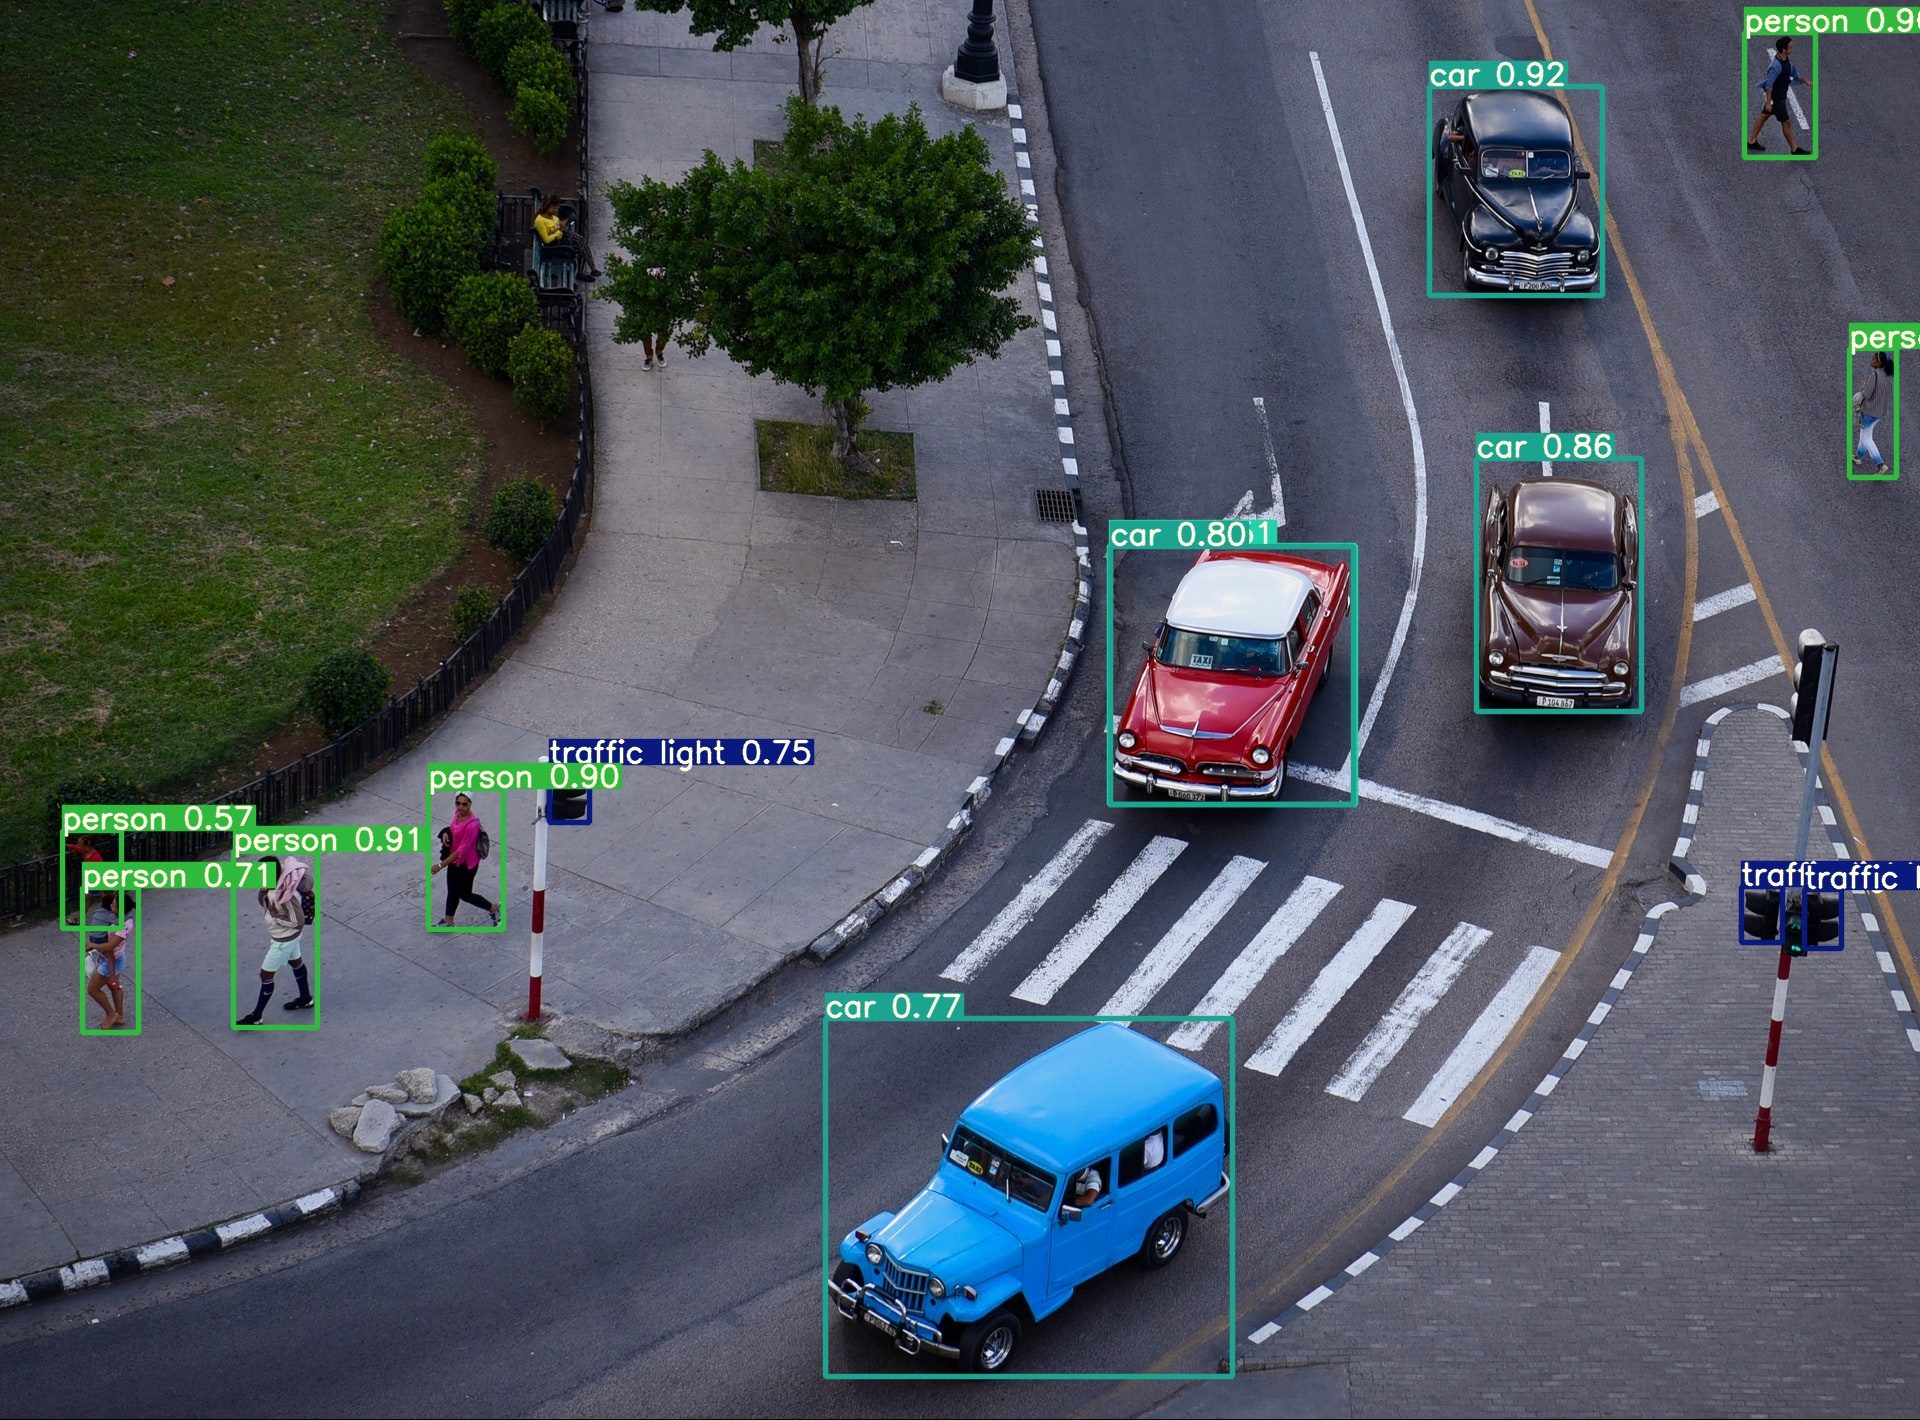
Hi Tom. I’m working with Yolov7 and how to deploy it in IMX8M PLus. I really liked so much this article and even more the cover photo because I’m Cuban. Thank you very much.
Thank you very much Roger !
Good luck with your deployment in Cuba,
Tom
Wonderful explanation! Encompasses all the relevant key information.
Hi Tom!!!!
Good explanation on object detection. However, it is detecting one object at a time. How to run the detection on a folder containing all the images to be detected? And how to save them all in a different folder?
Thanks in advance.
Hi Tamid,
You can try to use this code :
!python detect.py --weights yolov7-e6e.pt --source /your_pathHello,
Thanks for well written guide on the subject. If I want to use yolov7 to detect only one object like a car, then how can I achieve this?
Hello Salam,
Is your goal to only show the object detected by YOLOv7 that match the class “car” or to use YOLOv7 to only detect car ? The first will be easier.
In that case you can try to use a manual version of YOLOv7 and to only show detection that match the class “car”.
Otherwise if you wish to only detect car, I suggest you to use transfer learning to specifically retrain YOLOv7 for car detection.
Hoping it’ll help you,
Tom