
Ultralytics has just released its latest version of YOLO: YOLOv8. In this article, we see in detail how to use it!
YOLOv8 is the first version of YOLO released in 2023, on January 10th.
YOLO (You Only Look Once) is one of the most popular object detection algorithms in the field of Deep Learning.
The first version was released in 2016!
The main idea that makes YOLO so attractive is its ability to detect objects in an image in a single pass.
At the time, this was a major breakthrough because most algorithms had to be run repeatedly on different parts of the image.
Why ?
Because these algorithms could only detect one object at a time.
A considerable waste of time!
It was only a matter of time before YOLO’s capabilities caught on with professionals.
And that’s why we get a new version of YOLO several times a year.
In 2022, we’ve already seen on Inside Machine Learning :
Now, I invite you to upgrade to version 8.
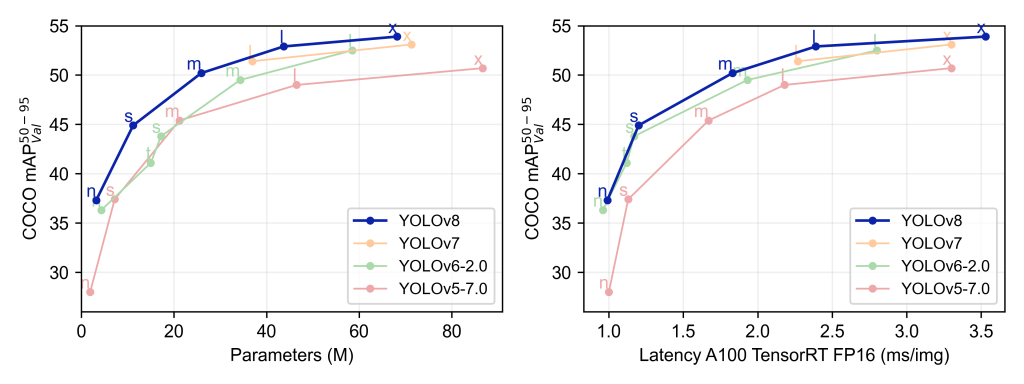
But first… Is YOLOv8 worth it?
I let you judge for yourself with the graph of its performance compared to the other versions of the model:
And now, let’s see how to use it!
How to use YOLOv8?
First of all, you will need the ultralytics library.
To install it from python use this command:
!pip install ultralyticsRemove the ! if you use a terminal.
Use on Python
To use YOLOv8 and display the result, you will need the following libraries:
from ultralytics import YOLO
import numpy as np
from PIL import Image
import requests
from io import BytesIO
import cv2
And if you are on Google Colab also import this one:
from google.colab.patches import cv2_imshowNow we can load a pre-trained version of YOLOv8 (by default ultralytics gives us the most recent one):
model = YOLO("yolov8n.pt")Then, we can load an image from the internet and transform it into a numpy array:
response = requests.get("https://images.unsplash.com/photo-1600880292203-757bb62b4baf?ixlib=rb-4.0.3&ixid=MnwxMjA3fDB8MHxwaG90by1wYWdlfHx8fGVufDB8fHx8&auto=format&fit=crop&w=2070&q=80")
image = Image.open(BytesIO(response.content))
image = np.asarray(image)
Then, we run the prediction on our image (this should be fast, even without GPU):
results = model.predict(image)We’ve run our prediction!
The results variable contains the list of bounding boxes enclosing the detected objects.
You can see them with print(results[0].boxes.data). They are in the format [x1, y1, x2, y2, score, label].
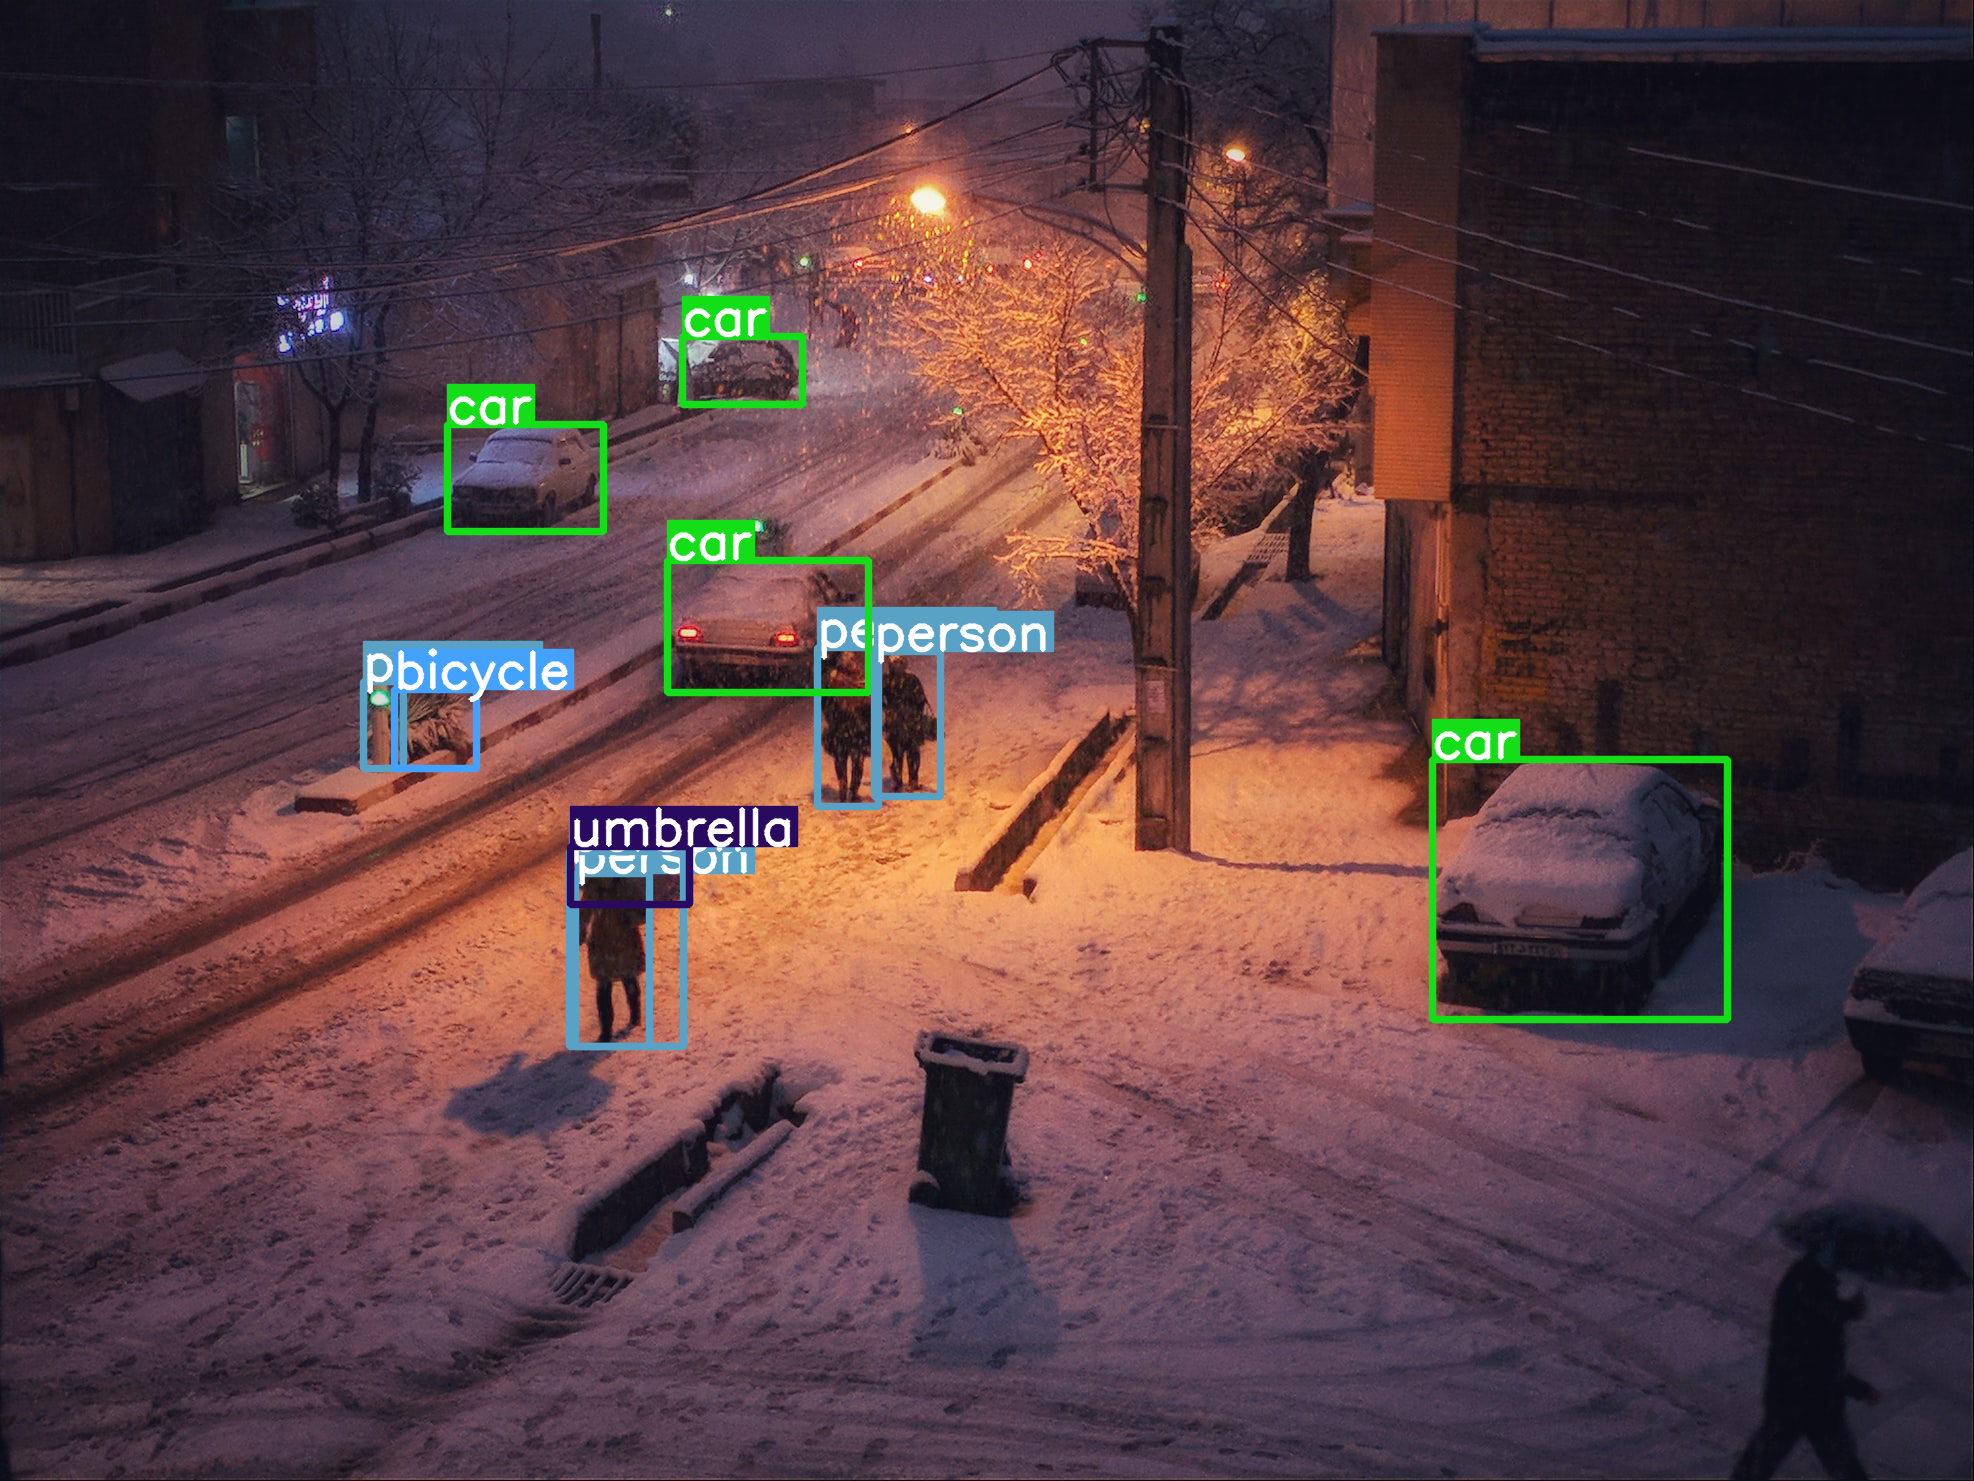
Now we’ll display our Bounding Boxes.
For that we use our function (short and simple) which allows us to display the bounding boxes with the label and the score. I have detailed it in this article.
Once you have copied the function, you can use it like this:
plot_bboxes(image, results[0].boxes.data, score=False)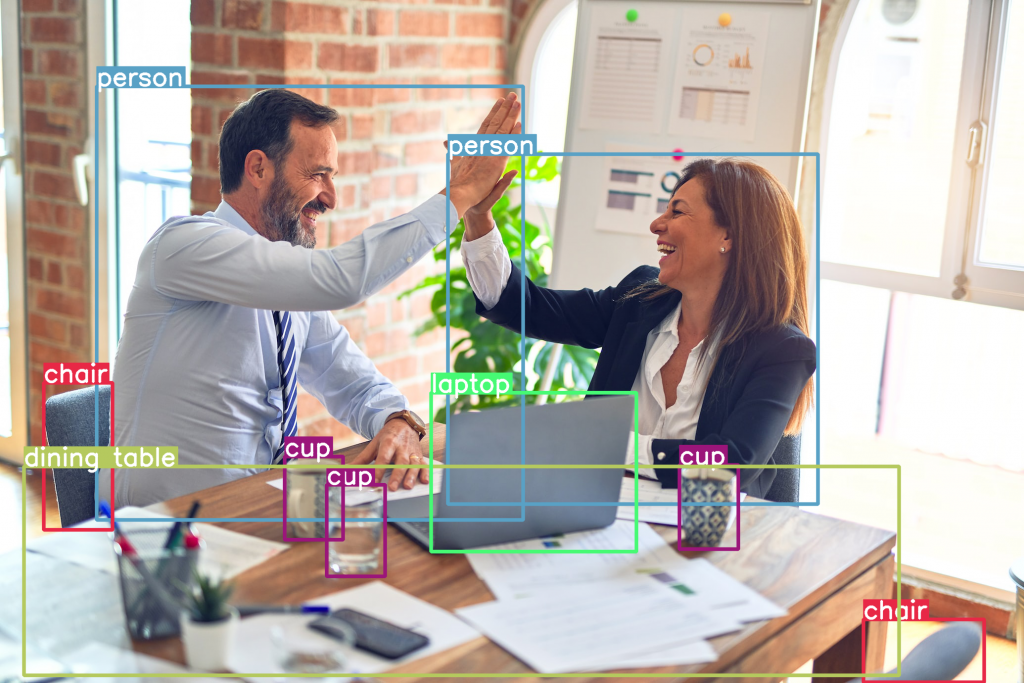
We get a lot of objects.
Some are relevant.
Others are not.
By the way, if your goal is to master Deep Learning - I've prepared the Action plan to Master Neural networks. for you.
7 days of free advice from an Artificial Intelligence engineer to learn how to master neural networks from scratch:
- Plan your training
- Structure your projects
- Develop your Artificial Intelligence algorithms
I have based this program on scientific facts, on approaches proven by researchers, but also on my own techniques, which I have devised as I have gained experience in the field of Deep Learning.
To access it, click here :
Now we can get back to what I was talking about earlier.
Like the chair at the bottom left.
In fact, the model did not detect all these objects with the same confidence score.
We can filter these objects according to this score.
For example, we can display only the bounding boxes with a confidence score higher than 85%.
Thus, all the objects detected with a lower score will not be displayed.
To filter according to the confidence score, we indicate conf=0.85 :
plot_bboxes(image, results[0].boxes.data, score=False, conf=0.85)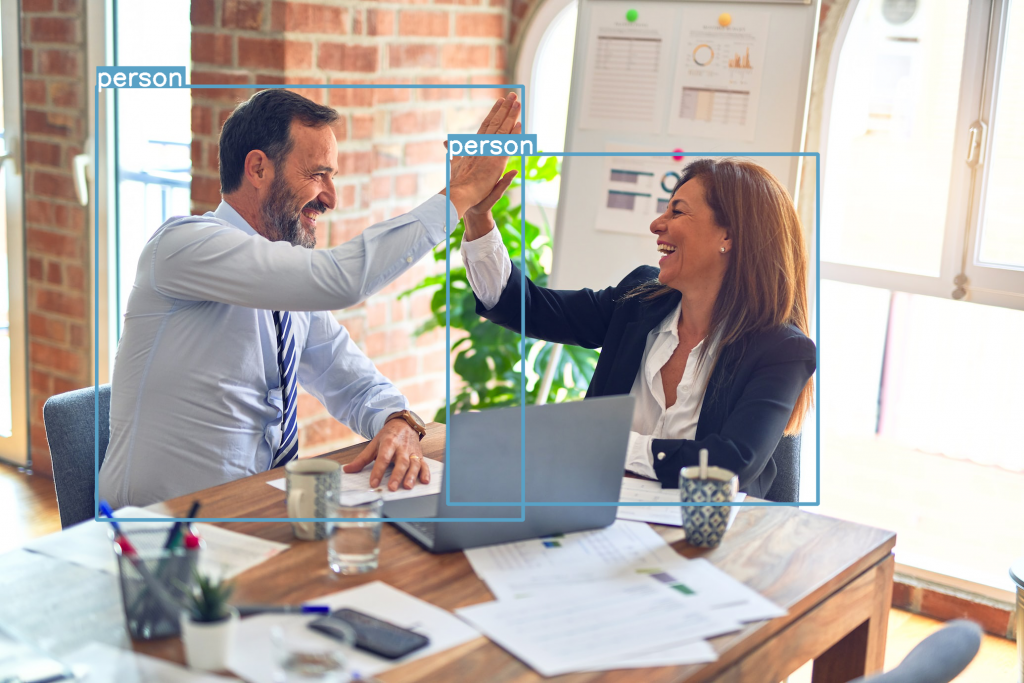
YOLOv8 detects both people with a score above 85%, not bad! ☄️
Use on Terminal
Ultralytics also allows you to use YOLOv8 without running Python, directly in a command terminal.
In this case, you have several options:
1. YOLOv8 on a single image
First of all you can use YOLOv8 on a single image, as seen previously in Python.
For this you only need to use the following command.
yolo task=detect mode=predict model=yolov8n.pt conf=0.25 source='/content/photo.jpeg'conf– indicates the confidence threshold for accepting a Bounding Box (here the score must be at least 25%)source– indicate the URL, or the path of your image if you have it locally
The result is in /runs/detect/predict/.
2. YOLOv8 on an image folder
Then, you can also use YOLOv8 directly on a folder containing images.
For that, you only have to indicate the path of your folder containing the images in source.
yolo task=detect mode=predict model=yolov8n.pt conf=0.25 source='/img_folder/'If you’ve run the previous commande, the result will be in /runs/detect/predict2/.
Re-train YOLOv8
Finally you can also re-train YOLOv8.
To do this, load the model yolov8n.yaml. This is an untrained version of the model :
from ultralytics import YOLO

model = YOLO("yolov8n.yaml")
Then you can train your model on the COCO dataset like this:
results = model.train(data="coco128.yaml", epochs=3)Evaluate it on your dataset:
results = model.val(data=your_data)And run predictions on new images (as seen before):
results = model.predict("https://images.unsplash.com/photo-1600880292203-757bb62b4baf?ixlib=rb-4.0.3&ixid=MnwxMjA3fDB8MHxwaG90by1wYWdlfHx8fGVufDB8fHx8&auto=format&fit=crop&w=2070&q=80")Lastly, you can also save your new model in ONNX format:
success = model.export(format="onnx")You’ve got almost everything you need to use YOLO v8.
Maybe you’d like to learn how to use this cutting-edge model on pre-recorded video.
In addition to detecting objects in a photo, maybe you’d like to learn how to use this cutting-edge model on pre-recorded video.
Maybe you’d even like to use it in real time on a continuous video stream.
It’s entirely possible to use YOLO v8 for these use cases, and if you’re interested, I’ve created the free Object Detection Off-road training course to help you learn everything about it:
To access your free training, click here :
source:
- Ultralytics – Github
Update 06/09/23:
- To access bounding boxes, use
results[0].boxes.datainstead ofresults[0].boxes.boxes
One last word, if you want to go further and learn about Deep Learning - I've prepared for you the Action plan to Master Neural networks. for you.
7 days of free advice from an Artificial Intelligence engineer to learn how to master neural networks from scratch:
- Plan your training
- Structure your projects
- Develop your Artificial Intelligence algorithms
I have based this program on scientific facts, on approaches proven by researchers, but also on my own techniques, which I have devised as I have gained experience in the field of Deep Learning.
To access it, click here :


Where is the plot_bboxes() function found.
Hi Bill,
Here is the link : https://inside-machinelearning.com/en/bounding-boxes-python-function/
You can also click on “in this article.” in the paragraph :
“Now we’ll display our Bounding Boxes.
For that we use our function (short and simple) which allows us to display the bounding boxes with the label and the score. I have detailed it in this article.
“
How can i calculate the value of IOU in YoloV8 ?
The article offers a great tutorial on how to use YOLOv8 effectively. It’s a valuable resource for those seeking clear instructions to make the most of this object detection model in their projects.