In this article, we’ll explore how to use Hugging Face 🤗 Transformers library, and in particular pipelines.
With over 1 million hosted models, Hugging Face is THE platform bringing Artificial Intelligence practitioners together.
Its 🤗 Transformers library provides simplified access to transformer models – trained by experts.
Thus, beginners, professionals and researchers can easily use cutting-edge models in their projects.
In a previous article, you learned more about Hugging Face and its 🤗 Transformers library. We explored the company’s purpose and the added value it brings to the field of AI.
Today, you’re going to find out how to use the 🤗 Transformers library concretely, using pipelines.
Pipelines – Hugging Face 🤗 Transformers
Definition
A pipeline in 🤗 Transformers refers to a process where several steps are followed in a precise order to obtain a prediction from a model.
Glossary
These steps can include data preparation, feature extraction and normalization.
You can think of it as a toolbox 🛠️ that automates complex tasks for you.
The main advantage of the pipeline is its ease of use. It requires just one line of code to load and another line of code to use.
🤗 Transformers offers a clear and intuitive API. So even if you’re not a Machine Learning expert, you can use these cutting-edge models.
You’ll be able to solve a variety of tasks such as Named Entity Recognition (NER), sentiment analysis, object detection, and many more.
The pipeline is an abstraction, meaning that even if on the surface you only use one line of code, in depth, many levers will be triggered.
Depending on the parameters you select, the pipeline will use TensorFlow, PyTorch or JAX to build and provide you with a model.
I recommend this great article if you’d like to delve deeper into the subject.
Speaking of code and parameters, let’s take a closer look at pipelines.
Import – Hugging Face 🤗 Transformers
To install the 🤗 Transformers library, simply use the following command in your terminal:
pip install transformersNote: if you’re working directly on a notebook, you can use !pip install transformers to install the library from your environment.
Once the library is installed, here’s how to import a pipeline into Python:
from transformers import pipelineTo use it, simply call pipeline(), specifying the required parameters in brackets.
The first thing to note is that you can specify the task you wish to perform using the task parameter.
You can simply choose the task you’re interested in, and the pipeline will do the rest for you.
Note: we’ll go into more detail about the different tasks that can be performed by the pipeline in the following sections of this article.
In addition to task, other parameters can be modulated to adapt the pipeline to your needs.
Parameter selection – Hugging Face 🤗 Transformers
🤗 Transformers gives you the flexibility to choose the model you want to use.
If you have a preference, you can specify it using the model parameters. If you don’t specify one, the pipeline will automatically use the default model for the selected task.
The config parameter lets you customize the model configuration. For example, for text generation models, you can set the maximum number of characters generated.
The tokenizer parameter, used for NLP tasks, and feature_extractor, used for computer vision and multimodal tasks, manage data encoding. Again, if you don’t specify anything, the pipeline will automatically choose the appropriate default values.
The choice of framework, whether PyTorch framework=pt or TensorFlow framework=tf, is also supported.
In addition to these key parameters, the 🤗 Transformers pipeline offers several additional options to customize your use.
For example, the device parameter lets you define the processor on which the pipeline will run: CPU or GPU.
Using these parameters, you can easily adapt the 🤗 Transformers pipeline to your specific needs.
This makes access to state-of-the-art models for a variety of tasks more open than ever.
Now that we’ve seen the main pipeline parameters, let’s take a concrete look at how to use this class on :
- Natural Language Processing
- Computer Vision
- Traitement Audio
- Multi-Modal
Natural Language Processing
A multitude of tasks
Natural Language Processing refers to text treatment using Artificial Intelligence.
Thanks to 🤗 Transformers pipelines, we can perform a multitude of tasks in this field:
conversational: textual communication with virtual agents or chatbotsfill-mask: replacing “masks” with words or phrases in text to complete or generate contentner: Named Entity Recognition – identification and classification of named entities (such as names of people, organizations or places) in textquestion-answering: answering textual questions by extracting information from a given textsummarization: reducing the length of a text while preserving relevant information to create a concise summarytable-question-answering: answering questions using tabular data as a source of informationtext2text-generation: text generation from source text, which can include tasks such as translation, rewriting or paraphrasing.text-classification: assigning a predefined category or label to a text based on its content.text-generation: creation of text from scratch or by adding to existing texttoken-classification: assigning labels to each token (unit of text, usually a word or character) in a text, often used for semantic annotation or entity detection (NER)translation: automatic translation
It’s easy to use a pipeline to perform each of these tasks.
Usage
For example, here I’m using a pipeline for a text-classification task in just 3 lines of code:
from transformers import pipeline

pipe = pipeline("text-classification")
pipe("This restaurant is awesome")
Output: [{'label': 'POSITIVE', 'score': 0.9998743534088135}]
The pipeline loads a default model automatically (here, the model loaded is distilbert-base-uncased-finetuned-sst-2-english). What’s more, the pipeline can process plain text directly, as it supports NLP preprocessing in addition to prediction.
Starting with the sentence “This restaurant is awesome”, the model predicts a positive tone from the author.
It is also possible to process several pieces of data at the same time. To do this, we simply pass a list of strings to the pipeline:
pipe(["This restaurant is awesome", "This restaurant is awful"])Output:[{'label': 'POSITIVE', 'score': 0.9998743534088135},
{'label': 'NEGATIVE', 'score': 0.9996669292449951}]
Here, the default loaded model perfectly determines the polarity of our sentences: positive or negative.
By the way, if your goal is to master Deep Learning - I've prepared the Action plan to Master Neural networks. for you.
7 days of free advice from an Artificial Intelligence engineer to learn how to master neural networks from scratch:
- Plan your training
- Structure your projects
- Develop your Artificial Intelligence algorithms
I have based this program on scientific facts, on approaches proven by researchers, but also on my own techniques, which I have devised as I have gained experience in the field of Deep Learning.
To access it, click here :
Now we can get back to what I was talking about earlier.
Computer vision
Computer Vision is the processing of images and image sequences (video) by Artificial Intelligence.
Here are the main tasks that 🤗 Transformers pipelines can solve:
depth-estimation: estimating the depth or distance of objects in an imageimage-classification: classification of an image into a predefined class or prediction of its contentsimage-segmentation: division of an image into regions or segments in order to identify the objects present in the imageobject-detection: location and classification of specific objects in an imagevideo-classification: classification of a video sequence into a given class according to its contentzero-shot-image-classification: classification of an image into a class not seen during model trainingzero-shot-object-detection: location and classification of specific objects in an image, including objects not seen during model training
Let’s illustrate the simplicity of the pipeline with a depth-estimation task.
First, let’s import an image :
from PIL import Image
import requests
from io import BytesIO

image_url = "https://cc0.photo/wp-content/uploads/2016/11/Fluffy-orange-cat-980x735.jpg"
Image.open(BytesIO(requests.get(image_url).content))
We then use a pipeline to process it. In addition, we indicate a model selected by ourselves the "Intel/dpt-large".
from transformers import pipeline

estimator = pipeline(task="depth-estimation", model="Intel/dpt-large")
result = estimator(images=image_url)
resultOutput:{'predicted_depth': tensor([[[ 6.3199, 6.3629, 6.4148, ..., 10.4104, 10.5109, 10.3847],...,[22.5176, 22.5275, 22.5218, ..., 22.6281, 22.6216, 22.6108]]]),'depth': <PIL.Image.Image image mode=L size=640x480>}
The result is given in the form of both a PyTorch tensor and a PIL image.
The image can be displayed like this:
result['depth']
Using the model we’ve selected, the pipeline easily determines the depth of our image.
Audio
An increasingly popular field in Artificial Intelligence is audio processing.
Here are the tasks that can be performed in this field with a pipeline of 🤗 Transformers:
audio-classification: assigning a category or label to an audio file based on its contentautomatic-speech-recognition: conversion of human speech into texttext-to-audio: conversion of text into audio files, usually using speech synthesizers or automated narration techniqueszero-shot-audio-classification: classification of audio files into predefined categories without the need for specific training data for each category, using pre-trained models to predict labels.
From the audio below, we’ll perform an automatic-speech-recognition task:
from transformers import pipeline

transcriber = pipeline(task="automatic-speech-recognition", model="openai/whisper-small")
transcriber("https://huggingface.co/datasets/Narsil/asr_dummy/resolve/main/mlk.flac")
Output: {'text': ' I have a dream that one day this nation will rise up and live out the true meaning of its creed.'}
Our whisper-small model from OpenAI perfectly transcribes audio into text.
Multimodal
The multimodal domain in AI refers to the simultaneous use of multiple input modes such as text, image and audio.
The following multimodal tasks can be solved with a pipeline:
document-question-answering: answering questions formulated in natural language, using documents as a source of informationfeature-extraction: extracting features or attributes from raw dataimage-to-text: conversion of visual information contained in an image into descriptive text or metadatavisual-question-answering: answering questions using visual information, usually based on images, combining image processing and natural language processing to provide answers.
Here, we’re going to ask the model what the person in the photo is wearing:

from transformers import pipeline

oracle = pipeline(model="dandelin/vilt-b32-finetuned-vqa")
image_url = "https://huggingface.co/datasets/Narsil/image_dummy/raw/main/lena.png"
oracle(question="What is she wearing ?", image=image_url)Output:[{'score': 0.9480270743370056, 'answer': 'hat'},
{'score': 0.008636703714728355, 'answer': 'fedora'},
{'score': 0.003124275477603078, 'answer': 'clothes'},
{'score': 0.0029374377336353064, 'answer': 'sun hat'},
{'score': 0.0020962399430572987, 'answer': 'nothing'}]
The multimodal model takes an image and text as input. This enables it not only to understand our photo, but also to answer our question.
Where to find models? – Hugging Face 🤗 Transformers
By default 🤗 Transformers loads a model when calling a pipeline.
However, it is also possible to use a model hosted by Hugging Face.
You can discover the full range of available models on the company’s website.
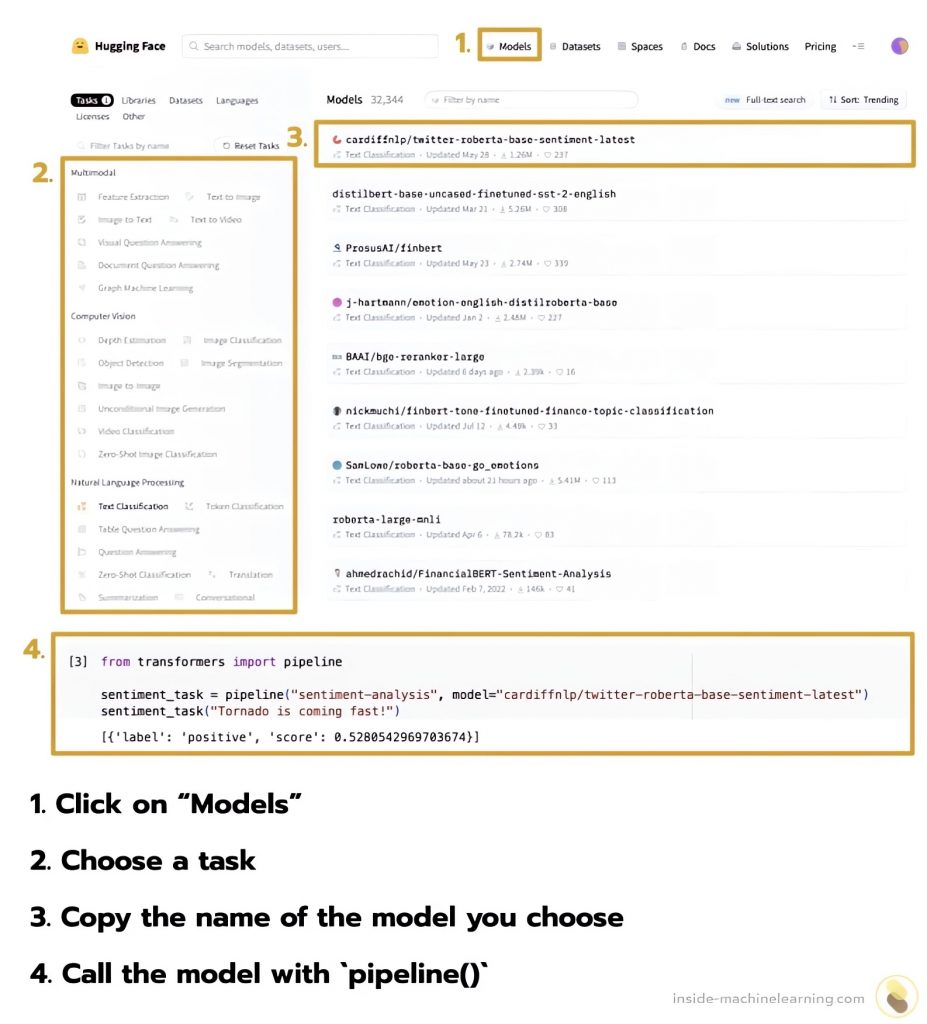
Once there, follow these steps to find the model that suits your needs:
- Click on “Models” at the top of the screen
- Choose a task from the menu on the left
- Copy the name of the model of your choice from the main window
- Call the copied model with
pipeline(model=modelName)
These steps are visually summarized below:

Thanks to its API, Hugging Face offers its users cutting-edge models.
The goal of Hugging Face is clear: to democratize AI within companies.
And it intends to become a major player in the field.
Today, it’s thanks to Deep Learning that tech leaders can create the most powerful Artificial Intelligences.
If you want to deepen your knowledge in the field, you can access my Action plan to Master Neural networks.
A program of 7 free courses that I’ve prepared to guide you on your journey to master Deep Learning.
If you’re interested, click here:
source: TechCrunch – Hugging Face raises $235M from investors, including Salesforce and Nvidia
One last word, if you want to go further and learn about Deep Learning - I've prepared for you the Action plan to Master Neural networks. for you.
7 days of free advice from an Artificial Intelligence engineer to learn how to master neural networks from scratch:
- Plan your training
- Structure your projects
- Develop your Artificial Intelligence algorithms
I have based this program on scientific facts, on approaches proven by researchers, but also on my own techniques, which I have devised as I have gained experience in the field of Deep Learning.
To access it, click here :


