
In this tutorial we will see how to simply and quickly use and train the BERT Transformer.
BERT is a Deep Learning model launched at the end of 2019 by Google. It is a Transformer, a very specific type of neural network. BERT stands for “Bidirectional Encoder Representations from Transformers“.
But in this post we won’t see in details what a Transformer is… I rather suggest you to see how to implement, train and use BERT easily !
To do this, we’ll take a classic NLP problem that you probably know : the classification of movie reviews.
Our Deep Learning model will be able to read a review and understand whether it is positive or negative.
This is what we’ve already done in this article with a more basic Deep Learning model… now let’s take it to the next level by doing it with BERT !

Preparing the data
Loading the model and data
First of all, we will use the tensorflow_hub library.
This is a library that allows access to models available on TensorFlow Hub.
In fact, TensorFlow Hub is a site listing official pre-trained Machine Learning models in the NLP domain as well as for Computer Vision and many others.
We will use tensorflow_hub to load BERT. Different types of BERT exist, we will take the lightest “bert_en_uncased_L-12_H-768_A-12” so that the execution is done quickly !
import tensorflow_hub as hub

module_url = "https://tfhub.dev/tensorflow/bert_en_uncased_L-12_H-768_A-12/1"
#module_url = "https://tfhub.dev/tensorflow/bert_en_uncased_L-24_H-1024_A-16/1"

bert_layer = hub.KerasLayer(module_url, trainable=True)
We then load our data which is available on this Github :
!git clone https://github.com/tkeldenich/BERT_Easy_Implementation &> /dev/nullimport pandas as pd
train = pd.read_csv("/content/BERT_Easy_Implementation/data/train.csv")
test = pd.read_csv("/content/BERT_Easy_Implementation/data/test.csv")train.head(3)Once we have our BERT model and our data, we load an essential component for training.
As you know, to perform NLP we need to do some preprocessing.
Well, for BERT, it’s the same thing !
Google has made available their tokenization algorithm (which allows to separate a sentence into a list of words) specific to BERT. We will therefore load it:
!wget --quiet https://raw.githubusercontent.com/tensorflow/models/master/official/nlp/bert/tokenization.pyThis algorithm requires the installation of the sentencepiece library:
!pip install sentencepiece &> /dev/nullWe can then build our encoder which is really specific to BERT.
Usually, a sentence is encoded as a list of digits where each digit represents a word or it is one-hot encoded as explained in this article…
Here, it’s quite different !
Data preprocessing
In fact, BERT doesn’t take one list of numbers as input, it takes three. Yes, you heard me right… it takes three lists of digits to train BERT and that’s what makes it so powerful!
But what do these three lists represent ?
Well it’s very simple there are three lists for three encodings :
- tokens, Classic hierarchical encoding, one word = one number
- pad_masks, Embedding of position to express the location of words in a sentence.
- segment_ids, Embeddings of segments: BERT can also take pairs of sentences as inputs for tasks, especially for Question-Answer models, this will not be the case here, so this list will be filled with zeros
The encoding function for BERT can be coded as follows :
import tokenization
import numpy as np

def bert_encode(texts, tokenizer, max_len=512):
    all_tokens = []
    all_masks = []
    all_segments = []

    for text in texts:
        text = tokenizer.tokenize(text)

        text = text[:max_len-2]
        input_sequence = ["[CLS]"] + text + ["[SEP]"]
        pad_len = max_len - len(input_sequence)

        tokens = tokenizer.convert_tokens_to_ids(input_sequence)
        tokens += [0] * pad_len
        pad_masks = [1] * len(input_sequence) + [0] * pad_len
        segment_ids = [0] * max_len

        all_tokens.append(tokens)
        all_masks.append(pad_masks)
        all_segments.append(segment_ids)

    return np.array(all_tokens), np.array(all_masks), np.array(all_segments)
We initialise the tokenizer by fetching from the BERT model both the vocabulary list and their associated index/number and the function to switch words from upper to lower case.
vocab_file = bert_layer.resolved_object.vocab_file.asset_path.numpy()
do_lower_case = bert_layer.resolved_object.do_lower_case.numpy()
tokenizer = tokenization.FullTokenizer(vocab_file, do_lower_case)
Finalement pour chaque csv (train et test) on créer deux variables :
- les phrases encodées pour BERT
- les labels sur lesquel BERT doit s’entraîner / prédire
Finally for each csv (train and test) we create two variables containing :
By the way, if your goal is to master Deep Learning - I've prepared the Action plan to Master Neural networks. for you.
7 days of free advice from an Artificial Intelligence engineer to learn how to master neural networks from scratch:
- Plan your training
- Structure your projects
- Develop your Artificial Intelligence algorithms
I have based this program on scientific facts, on approaches proven by researchers, but also on my own techniques, which I have devised as I have gained experience in the field of Deep Learning.
To access it, click here :
Now we can get back to what I was talking about earlier.
- the encoded sentences for BERT
- the labels on which BERT must train / predict
train_input = bert_encode(train.text.values, tokenizer, max_len=100)
test_input = bert_encode(test.text.values, tokenizer, max_len=100)
train_labels = train.label.values
test_labels = test.label.values
BERT & Transfer Learning
Initialize BERT
Our data is ready, now we need to build the model.
With TensorFlow Hub, we have already preloaded BERT but there are still some additions to be made.
Indeed, the BERT model we have is not complete. We only have layers of neurons and their associated pre-trained weights.
We need to add two things:
- the input layers : one for each list, so three layers
- the output layer : we do binary classification, so only one layer
This is what we do in this function :
import tensorflow as tf
from tensorflow.keras.layers import Dense, Input
from tensorflow.keras.optimizers import Adam
from tensorflow.keras.models import Model
from tensorflow.keras.callbacks import ModelCheckpoint

def build_model(bert_layer, max_len=512):
    input_word_ids = Input(shape=(max_len,), dtype=tf.int32, name="input_word_ids")
    input_mask = Input(shape=(max_len,), dtype=tf.int32, name="input_mask")
    segment_ids = Input(shape=(max_len,), dtype=tf.int32, name="segment_ids")

    _, sequence_output = bert_layer([input_word_ids, input_mask, segment_ids])
    clf_output = sequence_output[:, 0, :]
    out = Dense(1, activation='sigmoid')(clf_output)

    model = Model(inputs=[input_word_ids, input_mask, segment_ids], outputs=out)
    model.compile(Adam(lr=2e-6), loss='binary_crossentropy', metrics=['accuracy'])

    return model
Once coded, this function allows us to build our model :
model = build_model(bert_layer, max_len=100)To understand what we’ve just done, let’s display our neural network :
from keras.utils.vis_utils import plot_model

plot_model(model, to_file='model_plot.png', show_shapes=True, show_layer_names=True)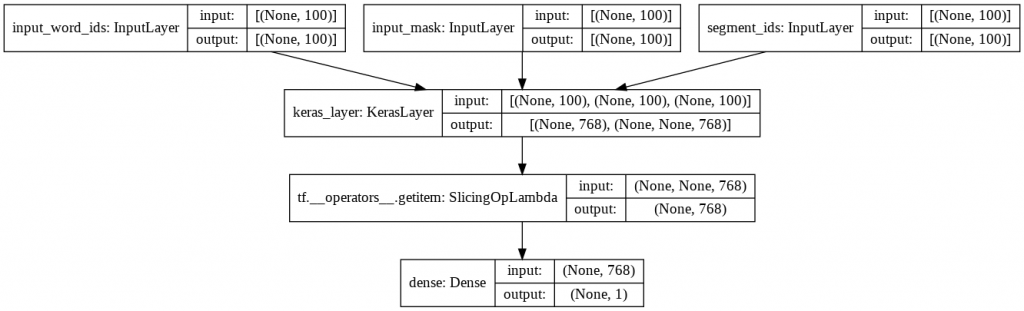
We now have a model with three entries that join to form a network of single layers.
The model may seem simple at first, but it is important to understand that within the KerasLayer (BERT’s layer) there are in fact several other layers.
They are not visible here because they are loaded from TensorFlow Hub but the name of the model speaks for itself: “bert_en_uncased_L-12_H-768_A-12“.
- L-12 : 12 hidden layers
- H-768 : a “hidden size” of 768, in fact 768 neurons (768 Hidden size)
- A-12 : 12 attention modules, these modules are used to make parallel calculations (12 attention heads)
Moreover we have en_uncase, that means that the text was put in lower case during preprocessing.
We will go into more detail in a future article on BERT and transformers.
In the meantime, let’s train our model !
Transfer Learning
train_history = model.fit(
    train_input, train_labels,
    validation_split=0.2,
    epochs=5,
    batch_size=32
)
But wait… why are we training our model if BERT is already pre-trained ?
Indeed, the weights of the BERT neurons are trained but not the weights of the new layers !
So we have to train the whole model. The new layers will then adapt to the weights of BERT.
This is called Transfer Learning, a technique that is widely used in Machine Learning because it allows already trained models to be adapted to new problems.
In fact, Google has trained BERT on many data for hours. Transfer Learning allows us to continue this training on our data, while avoiding the hours of training already done !
Utiliser BERT
model.evaluate(test_input, test_labels)We get a loss of 0.38 and an accuracy of 0.84, which is not bad… even very good considering the amount of data we have !
Let’s try our model with our own sentences.
Let’s start with an easy example “I liked that movie“:
model.predict(bert_encode(["I liked this movie"], tokenizer, max_len=100))BERT judges our positive sentence with an accuracy of 0.63. He doesn’t look very confident so the sentence seems obvious.
Let’s try a more complex sentence “Everything was fine but not the movie !“
model.predict(bert_encode(["Everything was fine but not the movie !"], tokenizer, max_len=100))Here BERT is almost 100% sure that the sentence speaks negatively about the movie, so it really depends on the input we give !
Finally, we can save the BERT adapted to our data :
model.save('/content/model.h5')And here is the code to load it into another program without having to re-train it :
#from tensorflow import keras
#model = keras.models.load_model('/content/model.h5')
BERT tutorial BERT tutorial BERT tutorial BERT tutorial
sources:
- Kaggle
- Photo by Samuel Wong on Unsplash
One last word, if you want to go further and learn about Deep Learning - I've prepared for you the Action plan to Master Neural networks. for you.
7 days of free advice from an Artificial Intelligence engineer to learn how to master neural networks from scratch:
- Plan your training
- Structure your projects
- Develop your Artificial Intelligence algorithms
I have based this program on scientific facts, on approaches proven by researchers, but also on my own techniques, which I have devised as I have gained experience in the field of Deep Learning.
To access it, click here :