Today I share with you this NLP Preprocessing tutorial to see in detail how to efficiently clean up your text data !
If you want to download the code directly, it is available on Github at this link.
We will see several approaches that will be adaptable to both English and French texts.
Then we’ll see how to encode these data in understandable format, interpretable by our Machine Learning and Deep Learning models.
Get started !
Preprocessing
Loading the data
First, as usual, we will load our data.
Here we take a csv file from this Kaggle competition containing several thousand English phrases.
Perfect for us 😉
We load the sentences from this Github directory.
!git clone https://github.com/tkeldenich/NLP_Preprocessing.git &> /dev/nullThen we insert this data into a Pandas dataframe.
import numpy as np
import pandas as pd

import os
train_data = pd.read_csv('/kaggle/working/NLP_Preprocessing/train.csv')
train_data.head()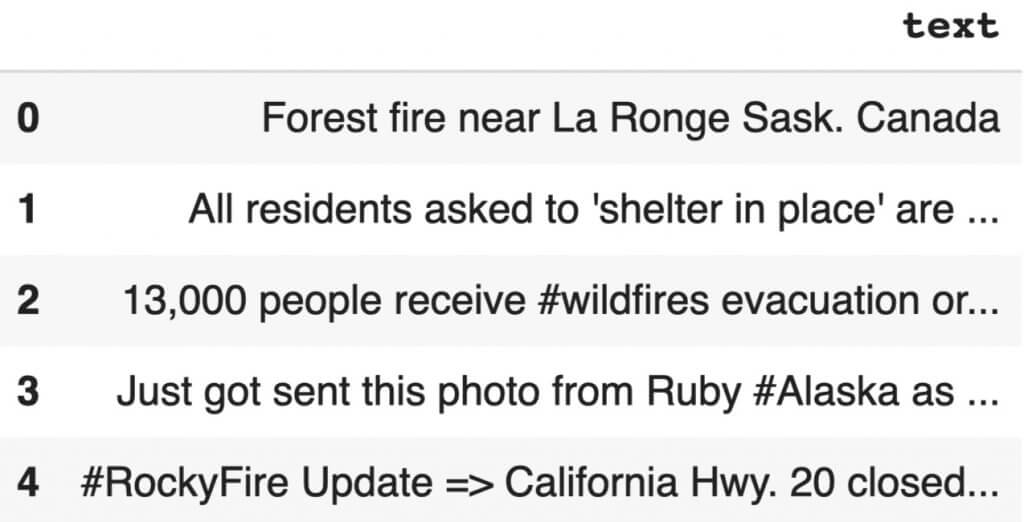
Cleaning the data
Once the data is loaded it needs to be cleaned up, this is called preprocessing.
In most cases for NLP, preprocessing consists of removing non-letter characters such as “#”, “-“, “!”, numbers or even words that do not make sense or are not part of the language being analyzed.
Keep in mind however that for certain types of problems it can be interesting to preserve certain types of characters.
For example: to analyze if an email is a spam or not, we can imagine that the ‘!’ are a good indicator and therefore do not remove them during cleaning.
Here we will code two functions :
- one to clean English language sentences
- one to clean French language sentences
These two functions have, moreover, the same architecture.
English text
First, we import the necessary libraries :
import nltk
import string
from nltk.stemimport WordNetLemmatizer

nltk.download('stopwords')
nltk.download('punkt')
nltk.download('words')
nltk.download('wordnet')
Then we initialize :
- stopwords, which are words that appear frequently but do not bring any meaning to the sentence (like “of”, “the”, “a”)
- words that come from an English dictionary(directly integrated to the nltk library)
- a lemmatizer, this object allows us to preserve the root of the words so that two words having the same strain will be considered as one and the same word (example: ‘neighbors’ and ‘neighborhood’ will both be changed into ‘neighbor’)
stopwords = nltk.corpus.stopwords.words('english')
words = set(nltk.corpus.words.words())
lemmatizer = WordNetLemmatizer()
Afterwards we build our preprocessing function which will successively :
- remove the punctuation
- remove the numbers
- transform the sentences into a list of tokens (a list of words)
- remove stopwords (words that don’t bring understanding)
- lemmatize
- remove capital letters
- reform sentences with the remaining words
def Preprocess_listofSentence(listofSentence):
 preprocess_list = []
 for sentence in listofSentence :
  sentence_w_punct = "".join([i.lower() for i in sentence if i not in string.punctuation])

  sentence_w_num = ''.join(i for i in sentence_w_punct if not i.isdigit())

  tokenize_sentence = nltk.tokenize.word_tokenize(sentence_w_num)

  words_w_stopwords = [i for i in tokenize_sentence if i not in stopwords]

  words_lemmatize = (lemmatizer.lemmatize(w) for w in words_w_stopwords)

  sentence_clean = ' '.join(w for w in words_lemmatize if w.lower() in words or not w.isalpha())

  preprocess_list.append(sentence_clean)

 return preprocess_list
We use it :
preprocess_list = Preprocess_listofSentence(train_data['text'])And we can display an example of a cleaned sentence :
print('Base sentence : '+train_data['text'][2])
print('Cleaned sentence : '+preprocess_list[2])- Base sentence : 13,000 people receive #wildfires evacuation orders in California
- Cleaned sentence : people receive wildfire evacuation order
French text
Here we will first install the FrenchLefffLemmatizer library which allows to perform a lemmatization in French.
!pip install git+https://github.com/ClaudeCoulombe/FrenchLefffLemmatizer.git &> /dev/nullImporting libraries.
import nltk
import string
from french_lefff_lemmatizer.french_lefff_lemmatizer import FrenchLefffLemmatizer

nltk.download('wordnet')
nltk.download('punkt')
nltk.download('stopwords')
Then we initialize :
- the stopwords, which are words that appear very frequently but do not bring any meaning to the sentence (like “de”, “le”, “une”)
- words that come from a French dictionary (a .txt dictionary is available here)
- a lemmatizer, this object allows us to preserve the root of the words so that two words having the same strain will be considered as the same word (example: ‘voisine’ and ‘voisinage’ will both be changed to ‘voisin’)
french_stopwords = nltk.corpus.stopwords.words('french')
mots = set(line.strip() for line in open('/content/NLP_Preprocessing/dictionnaire.txt'))
lemmatizer = FrenchLefffLemmatizer()
Afterwards we build our preprocessing function which will successively :
- remove the punctuation
- remove the numbers
- transform the sentences into a list of tokens (a list of words)
- remove stopwords (words that don’t make sense)
- lemmatize
- keep only the words present in the dictionary
- remove capital letters
- reform sentences with the remaining words
def French_Preprocess_listofSentence(listofSentence):
 preprocess_list = []
 for sentence in listofSentence :
  sentence_w_punct = "".join([i.lower() for i in sentence if i not in string.punctuation])

  sentence_w_num = ''.join(i for i in sentence_w_punct if not i.isdigit())

  tokenize_sentence = nltk.tokenize.word_tokenize(sentence_w_num)

  words_w_stopwords = [i for i in tokenize_sentence if i not in french_stopwords]

  words_lemmatize = (lemmatizer.lemmatize(w) for w in words_w_stopwords)

  sentence_clean = ' '.join(w for w in words_lemmatize if w.lower() in mots or not w.isalpha())

  preprocess_list.append(sentence_clean)

 return preprocess_list
We create data to try out our function :
lst = ['C\'est un test pour lemmatizer',
       'plusieurs phrases pour un nettoyage',
       'eh voilà la troisième !']
french_text = pd.DataFrame(lst, columns =['text'])
Then we use it :
french_preprocess_list = French_Preprocess_listofSentence(french_text['text'])And we look at the results :
print('Base sentence : '+lst[1])
print('Cleaned sentence : '+french_preprocess_list[1])- Base sentence : plusieurs phrases pour un nettoyage
- Cleaned sentence : plusieurs phrase nettoyage

The different encodings
Once we have extracted the useful informations from our sentences, we can move on to the encoding phase.
Encoding is an essential step in Machine Learning.
Indeed, it allows us to transform the text data into numbers that the machine can interpret and understand.
There are different types of encoding and we are now going to talk about the most famous ones !
One-Hot Encoding
The One-Hot Encoding is the most known method, the easiest to realize, and the one that allowed me to have the best accuracy in most of my personal works in NLP.
One-Hot consists in creating a dictionary with every words that appear in our cleaned sentences.
This dictionary is in fact a table where each column represents a word and each row represents a sentence.
If such a word appears in such a sentence, we put a 1 in the element of the table, otherwise we put a 0.
We will thus have an array composed only of 0 and 1.
To realize the One-Hot Encoding in Python, we initialize the dictionary with the CountVectorizer() function of the Sklearn library.
Then we use the fit_transform() function on our preprocessed data.
from sklearn.feature_extraction.text
import CountVectorizer vectorizer = CountVectorizer()
X = vectorizer.fit_transform(preprocess_list)X.toarray()[0]In fact the class vectorizer keeps a lot of other information about the dictionary.
Moreover, if we want to encode new sentences to use on our trained Machine Learning model we will have to use the fit() function of the vectorizer class.
This way we can adapt these new sentences to our dictionary. However, this implies that if these new sentences contain a word that is not in the dictionary, it will not be taken into account.
We can see the words in the dictionary with the get_feature_names() function.
vectorizer.get_feature_names()The only disadvantage of One-Hot Encoding is that we lose the hierarchy, the order of the words.
This means that we lose the context, the meaning of the sentence and in theory this should impoverish the results of our model.
In practice, it is quite different, we can have results with 80-85% accuracy which is actually very interesting for NLP!
Word embeddings
Hierarchical encoding
Here we use another type of encoding: hierarchical encoding.
Contrary to One-Hot Encoding, as you can imagine, we keep the hierarchy, the order of the words and therefore the meaning of the sentence.
By the way, if your goal is to master Deep Learning - I've prepared the Action plan to Master Neural networks. for you.
7 days of free advice from an Artificial Intelligence engineer to learn how to master neural networks from scratch:
- Plan your training
- Structure your projects
- Develop your Artificial Intelligence algorithms
I have based this program on scientific facts, on approaches proven by researchers, but also on my own techniques, which I have devised as I have gained experience in the field of Deep Learning.
To access it, click here :
Now we can get back to what I was talking about earlier.
We have another type of dictionary here. In fact, each word is represented by a number.
Each sentence will therefore be a sequence of numbers.
An example will be more relevant :
- “I play the video game” will be [1, 2, 3, 4, 5]
- “I watch a video” will be [1, 6, 7, 4]
For this encoding we import the zeugma library.
!pip install zeugma &> /dev/nullThen, the operation is about the same as for the one-hot encoding : we use the TextsToSequences() function to create our dictionary.
And we use the fit_transform() function on our preprocessed sentences.
from zeugma import TextsToSequences

sequencer = TextsToSequences()
embedded_sequ = sequencer.fit_transform(preprocess_list)
An example of a sentence with hierarchical encoding :
embedded_sequ[0][95, 1, 135, 434, 874]
One last thing to do : normalize our data.
Yes, in order to use Machine Learning, our data must be in tensor format.
This implies that every encoded sentences must have the same size.
To do so, we have two choices here:
- add ’emptiness’ to the shortest sentences
- truncate the longest sentences
For these two choices, a same function exists : sequence.pad_sequences()
It has two parameters :
- sentences the list of sentences to fill/truncate
- maxlen the final length that each sentence will have
In fact this function truncates the sentences with a length higher than maxlen and fills with 0 the sentences with a length lower than maxlen.
from keras.preprocessing import sequence

max_len = 40
pad_sequ = sequence.pad_sequences(embedded_sequ, maxlen=max_len)
You can display an encoded sentence to see the result :
print(pad_sequ[0])[ 0 0 0 0 0 0 0 0 0 0 0 0 0 0 0 0 0 0 0 0 0 0 0 0 0 0 0 0 0 0 0 0 0 0 0 95 1 135 434 874]
Couche Embedding
Actually, the hierarchical encoding is a prerequisite to use the Embedding layer of Keras.
This layer allows us to give coordinates to every words of our dictionary while performing a learning process.
The idea is that the closer the words have a meaning, the closer the words have coordinates.
The layer will therefore improve, like every other layers, during the learning process. Thus at the end of the learning process, the layer will have given precise coordinates for each word.
The Embedding layer has three parameters:
- input_dim, the number of words in our dictionary + 1
- output_dim, the dimension of the output tensor
- input_length, the length of the vectors (normalized sentence length)
longueur_dict = max(list(map(lambda x: max(x), pad_sequ)))+1from keras.models import Sequential
from keras.layers import Embedding, Flatten, Dense
model = Sequential()
model.add(Embedding(longueur_dict, 8, input_length = max_len))
model.add(Flatten())
model.add(Dense(1, activation='sigmoid'))We can then run the learning process with the fit() function and use our model !

To go further…
Word2Vec Embedding
Training
There are different libraries to realize embedding.
Keras is particularly useful for this task because it allows to train the embedding at the same time as the Deep Learning model.
The Gensim library is at least as interesting as Keras because it allows us to visualize this embedding.
That is to say that we can analyze the embedding by looking at which word is similar to which other.
For this embedding, our data must be in the form of tokens (each word separated) and not in the form of sentences.
tokenize_sentences = []

for i in range(len(preprocess_list)):
tokenize_sentences.append(nltk.tokenize.word_tokenize(preprocess_list[i]))
Then, we use the Word2Vec function of the Gensim library.
This function has five main parameters:
- size : The dimension of the created vector, ideally smaller than the number of words in the vocabulary
- window : The maximum distance between a target word and the words around the target word. The default window is 5.
- min_count : The minimum number of words to consider when training the model; words with less than this number of occurrences will be ignored. The default value of min_count is 5.
- worker : The number of batches created for training, by default there are 3.
First we initialize the Word2Vec, then we train it on our data !
from gensim.test.utils import common_texts
from gensim.models import Word2Vec

model_W2V = Word2Vec(sentences=tokenize_sentences, size=100, window=5, min_count=1, workers=4)
model_W2V.train(tokenize_sentences, total_examples=len(tokenize_sentences), epochs=50)
Visualization
The model learned the similarity of words based on the context of our sentences.
The title (context) of our dataset is ‘Disaster Tweet’
We can for example look at which word is close to ‘fire’ by using the similar_by_word()function.
tokenize_sentences[0][1]model_W2V.similar_by_word(tokenize_sentences[0][1])[:5]The first five are ‘decomposition’, ‘township’, ‘racer’, ‘beast’ and ‘apartment’.
This means that most of the time, ‘fire’ has been used alongside these words.
To better visualize this similarity we can use the following function :
from sklearn.manifold import TSNE
from matplotlib import pyplot as plt

def display_closestwords_tsnescatterplot_perso(model, word):
 arr = np.empty((0,100), dtype='f')
 word_labels = [word]

 numb_sim_words = 5

 # get close words
 close_words = model.similar_by_word(word)[:numb_sim_words]

 # add the vector for each of the closest words to the array
 arr = np.append(arr, np.array([model[word]]), axis=0)
 for wrd_score in close_words:
  wrd_vector = model[wrd_score[0]]
  word_labels.append(wrd_score[0])
  arr = np.append(arr, np.array([wrd_vector]), axis=0)

 # find tsne coords for 2 dimensions
 tsne = TSNE(n_components=2, random_state=0)
 np.set_printoptions(suppress=True)
 Y = tsne.fit_transform(arr)

 x_coords = Y[:, 0]
 y_coords = Y[:, 1]

 # color for words
 color = ['red']
 for i in range(numb_sim_words):
  color.append('blue')

 # display scatter plot
 plt.scatter(x_coords, y_coords, c = color)

 for label, x, y in zip(word_labels, x_coords, y_coords):
  plt.annotate(label, xy=(x, y), xytext=(1, 5), textcoords='offset points')
 plt.xlim(min(x_coords)-100, max(x_coords)+100)
 plt.ylim(min(y_coords)-100, max(y_coords)+100)
 plt.show()

 print("Word most similar to : "+word)
 print([sim_word[0] for sim_word in close_words])
And then use it by specifying the Embedding model and the word to analyze :
display_closestwords_tsnescatterplot_perso(model_W2V, tokenize_sentences[0][0])The disadvantage of Word2vec is that it learns the meaning of a word only according to the words around it, whereas Keras learns the meaning of words according to the purpose (y_train) set during the learning process.
In other words, Word2Vec has an unsupervised approach and Keras a supervised approach.
Word2Vec Pré-entraîné par Google
Another approach is to take a trained Word2Vec.
Google and Facebook offer theirs which, as you can imagine, has been trained on millions (billions?) of data !
Ideal to have a general representation of the vocabulary of a language.
However, the Word2Vec trained by Facebook, Google, or others cannot be adapted, trained on our sentences. We can only use them while keeping the general context on which they have been trained.
You can download here the Word2Vec trained by Google (1.5GB) (available on this link if you want to download it locally) :
!wget -q --show-progress --load-cookies /tmp/cookies.txt "https://docs.google.com/uc?export=download&confirm=$(wget --quiet --save-cookies /tmp/cookies.txt --keep-session-cookies --no-check-certificate 'https://docs.google.com/uc?export=download&id=0B7XkCwpI5KDYNlNUTTlSS21pQmM' -O- | sed -rn 's/.confirm=([0-9A-Za-z_]+)./\1\n/p')&id=0B7XkCwpI5KDYNlNUTTlSS21pQmM" -O word2vec_pretrained.bin.gz && rm -rf /tmp/cookies.txtThen we use the sh library to unzip it.
!pip install sh &> /dev/nullWe unzip it :
from sh import gunzip

gunzip('/content/word2vec_pretrained.bin.gz')
Then we use the load_word2vec_format() function of the KeyedVectors class to load the Google Word2vec.
from gensim.models import KeyedVectors

model = KeyedVectors.load_word2vec_format('/content/word2vec_pretrained.bin', binary=True)
It can then be used with a Deep Learning model.
I propose here to explore the representation of the model, the links it makes between words …
We can for example look at the words similar to ‘koala’ we get ‘koalas’, ‘wombat’, ‘quoll’, ‘orang_utan’, ‘Koala’.
model.similar_by_word('koala')[:5]Or compare the similarity between two words :
model.similarity('hotdog', 'hamburger')Or use our function from earlier for a more concrete visualization.
from sklearn.manifold import TSNE
from matplotlib import pyplot as plt
import numpy as np

def display_closestwords_tsnescatterplot(model, word):
 arr = np.empty((0,300), dtype='f')
 word_labels = [word]
 numb_sim_words = 5

 # get close words
 close_words = model.similar_by_word(word)[:numb_sim_words]

 # add the vector for each of the closest words to the array
 arr = np.append(arr, np.array([model[word]]), axis=0)
 for wrd_score in close_words:
  wrd_vector = model[wrd_score[0]]
  word_labels.append(wrd_score[0])
  arr = np.append(arr, np.array([wrd_vector]), axis=0)

 # find tsne coords for 2 dimensions
 tsne = TSNE(n_components=2, random_state=0)
 np.set_printoptions(suppress=True)
 Y = tsne.fit_transform(arr)

 x_coords = Y[:, 0]
 y_coords = Y[:, 1]

 # color for words
 color = ['red']
 for i in range(numb_sim_words):
  color.append('blue')

 # display scatter plot
 plt.scatter(x_coords, y_coords, c = color)

 for label, x, y in zip(word_labels, x_coords, y_coords):
  plt.annotate(label, xy=(x, y), xytext=(1, 5), textcoords='offset points')
 plt.xlim(min(x_coords)-100, max(x_coords)+100)
 plt.ylim(min(y_coords)-100, max(y_coords)+100)
 plt.show()
display_closestwords_tsnescatterplot(model, 'challenge')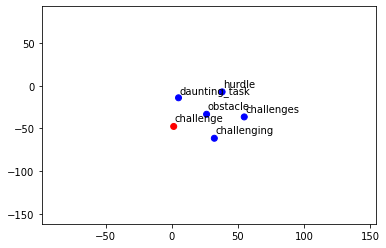
With this knowledge, you should have the tools in hand to train your own NLP models or improve your already trained ones.
If you want to know more about NLP Machine Learning models, feel free to check our articles on the subject ! 😊
Preprocessing NLP Preprocessing NLP Preprocessing NLP Preprocessing NLP Preprocessing NLP Preprocessing NLP
One last word, if you want to go further and learn about Deep Learning - I've prepared for you the Action plan to Master Neural networks. for you.
7 days of free advice from an Artificial Intelligence engineer to learn how to master neural networks from scratch:
- Plan your training
- Structure your projects
- Develop your Artificial Intelligence algorithms
I have based this program on scientific facts, on approaches proven by researchers, but also on my own techniques, which I have devised as I have gained experience in the field of Deep Learning.
To access it, click here :